

Sharing is caring!
Table of Contents
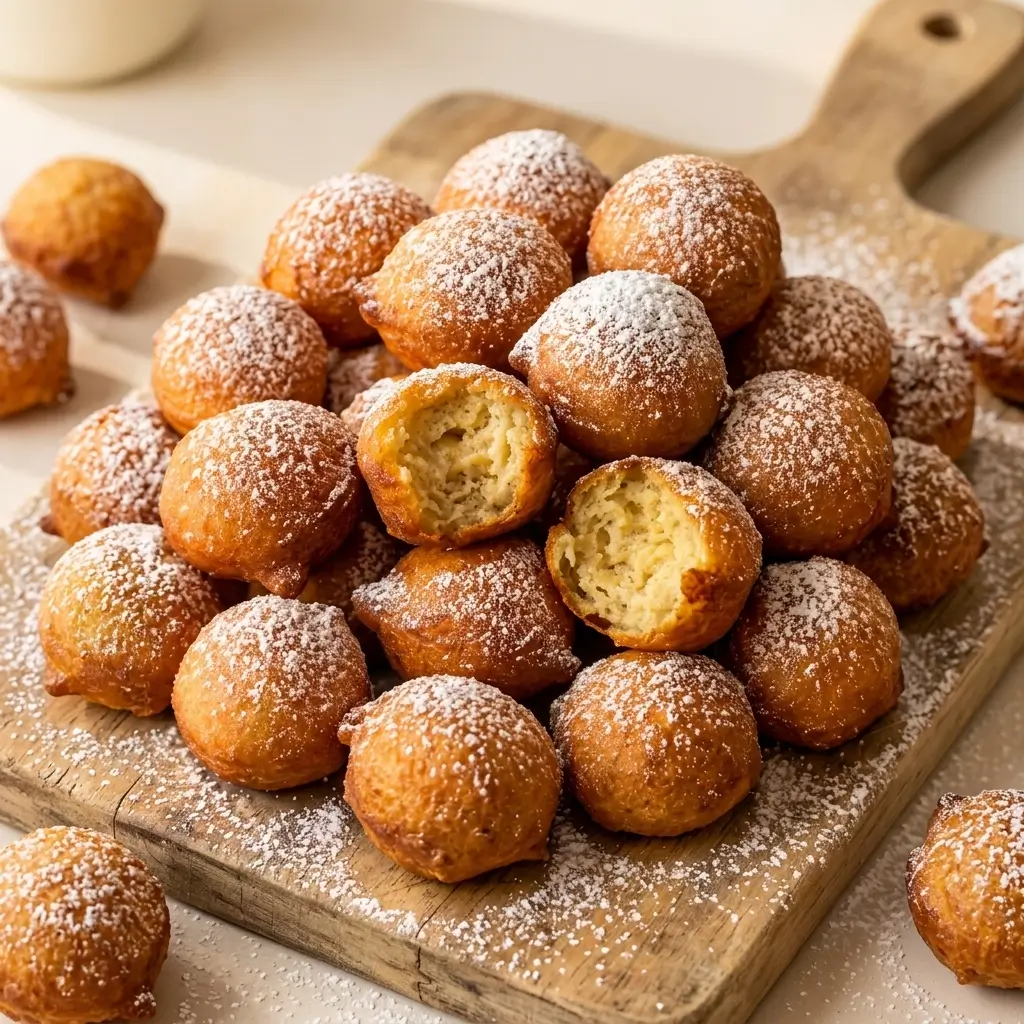
The Banana Donut Bites That Taste Like a Warm Hug
You know those days when you have a banana that’s past its prime? Too spotty for eating, too soft for slicing, but too good to throw away? This is what you make with that banana.
Little bites of fried dough, kissed with banana sweetness, dusted with powdered sugar. They’re soft and pillowy on the inside, golden and crispy on the outside. Like tiny donut holes, but made with banana. And they come together with ingredients you already have in your kitchen.
I make these when I want something sweet but don’t want to make a whole production of it. When I have a banana that’s begging to be used. When I want to feel like I’m treating myself to something special, without actually doing much work. They’re fast, they’re comforting, and they disappear almost as fast as you can make them.
Why These Donut Bites Work
- Uses That Ripe Banana. The perfect way to use up a banana that’s too spotty to eat.
- No Yeast Rising Time. The dough rests for 20-30 minutes, but there’s no long rise. Quick and easy.
- Soft and Pillowy. The banana keeps them tender and moist on the inside.
- Golden and Crispy. Fried to perfection, then dusted with powdered sugar. Irresistible.
What You’ll Need
- 1 ripe banana, mashed – The spottier, the sweeter.
- 1¼ cups all-purpose flour
- 1 egg
- 1 tablespoon sugar
- ½ teaspoon yeast – Active dry or instant. Just a little to give them lightness.
- 1 teaspoon oil – Any neutral oil works.
- Oil, for frying – Vegetable, canola, or any neutral oil with a high smoke point.
- Powdered sugar, for dusting
Let’s Make Them (Golden, Fluffy, and Gone in 5 Minutes)
(Fair warning: these little bites are dangerously addictive—you’ve been warned)
Step 1: Mash That Banana Like You Mean It
Grab a ripe banana—the spottier, the better (that’s where all the sweetness hides). Toss it in a bowl and mash it until it’s silky smooth. Get in there with a fork and really go to town—lumps are not your friend here. Think: baby food consistency, but way more delicious.
Step 2: Mix Up the Batter (It’s Gonna Be Lovely)
Crack in your egg, add the sugar, yeast, and a teaspoon of oil, and stir everything together until it’s all friendly and combined. Now start adding the flour—little by little—stirring as you go. You’re aiming for a soft, sticky dough or a thick, scoopable batter. Don’t overthink it; it’s supposed to be rustic, not perfect.
Step 3: Give It a Little Nap
Cover the bowl with a kitchen towel or plastic wrap and let it rest for 20 to 30 minutes. This isn’t just waiting—it’s magic time. The yeast wakes up, the dough relaxes, and everything gets puffy and light. Go make yourself a cup of tea or scroll your phone. You’ve earned it.
Step 4: Heat Things Up
Pour about an inch of oil into a deep skillet or pot and heat it over medium. Not sure if it’s ready? Drop in a tiny pinch of dough—if it sizzles, bubbles, and floats right up to the surface like it’s happy to be there, you’re good to go. If it sinks and sulks, give the oil a couple more minutes.
Step 5: Fry ‘Em Up
Carefully drop small spoonfuls of dough into the hot oil—don’t overcrowd them, they like their personal space. Let them fry for 2 to 3 minutes on each side, until they turn that gorgeous golden-brown color and puff up like little pillows of joy. Flip them gently with a spatula or tongs—they’re delicate, so be kind.
Step 6: Drain and Dust with Love
Scoop them out with a slotted spoon and let them rest on paper towels to soak up any extra oil. Then—while they’re still warm and irresistible—dust them generously with powdered sugar. Don’t be shy. Coat them like they just walked through a snowstorm.
Step 7: Dig In While They’re Warm
Serve them up fresh and warm, because that’s when they’re absolutely magical—crispy on the outside, soft and pillowy on the inside, with that sweet banana flavor shining through. They’re best right away, but honestly? Even a few hours later, they’ll still make you smile.
Now grab one, take a bite, and try not to close your eyes in pure happiness. (I dare you.) 🍌✨
Homemade Banana Donut Bites
| Prep Time | Rest Time | Cook Time | Total Time | Servings |
|---|---|---|---|---|
| 15 minutes | 30 minutes | 6 minutes | 51 minutes | 4-6 |
A Few Things I’ve Learned
- Use a spotty banana. The browner, the sweeter. This is the perfect use for bananas that are too ripe for eating.
- Don’t skip the rest. Those 20-30 minutes give the yeast time to work and the dough time to relax.
- Test the oil. A piece of dough should sizzle and float. If it sinks, the oil isn’t hot enough.
- Fry in batches. Overcrowding drops the oil temperature and makes them greasy instead of crispy.
- Dust while warm. The powdered sugar sticks better when they’re still hot.
Ways to Make This Your Own
- Add Cinnamon: Add ½ teaspoon of cinnamon to the dough for warm spice.
- Add Nutmeg: A pinch of nutmeg adds depth.
- Dip in Cinnamon Sugar: Instead of powdered sugar, toss in cinnamon sugar while warm.
- Add Chocolate Chips: Fold in ¼ cup mini chocolate chips.
- Drizzle with Glaze: Make a simple glaze with powdered sugar and milk.
- Make Them Mini: Drop smaller spoonfuls for bite-sized donut holes.
Your Donut Bites Questions, Answered
Q: Can I use a different type of flour?
A: Yes. Whole wheat flour will work, but the texture will be denser. Gluten-free flour should also work.
Q: Can I bake these instead of frying?
A: Yes. Drop spoonfuls onto a baking sheet and bake at 375°F for 12-15 minutes. They won’t be as golden or crispy, but they’ll still be delicious.
Q: Can I make the dough ahead of time?
A: The dough is best made fresh. You can refrigerate it for a few hours, but the texture will be slightly different.
Q: What oil is best for frying?
A: Vegetable, canola, or any neutral oil with a high smoke point.
Q: Can I freeze these?
A: Yes. Freeze in a single layer, then transfer to a freezer bag. Reheat in the oven or toaster oven to restore crispiness.
You Might Also Like
- How to Make Costco Raspberry Crumble Cookies
- Blueberry Cheesecake Crescent Rolls (20 Minutes!)
- 3-Ingredient German Chocolate Dump Cake
- 4-Ingredient Cake Mix Peanut Butter Cookies (So Easy!)
- 3-Ingredient Blender Peach Ice Cream (No Maker Needed!)

Homemade Banana Donut Bites (Soft & Fluffy!)
Course: Dessert, SnackCuisine: AmericanDifficulty: Easy5
servings15
minutes6
minutes300
kcal30
minutes51
minutesHomemade Banana Donut Bites are soft, fluffy, and golden fried. Made with ripe banana, flour, and yeast. Dusted with powdered sugar. The perfect sweet treat!
Ingredients
1 ripe banana, mashed (about ½ cup)
1¼ cups (155g) all-purpose flour
1 large egg
1 Tbsp (12g) granulated sugar
½ tsp active dry or instant yeast
1 tsp vegetable oil (for dough)
Vegetable oil, for frying
Powdered sugar, for dusting
Directions
- In a bowl, mash banana until smooth.
- Add egg, sugar, yeast, and 1 tsp oil. Stir to combine.
- Gradually add flour, stirring until a soft dough or thick batter forms.
- Cover and let rest 20-30 minutes.
- Heat about 1 inch of oil in a deep skillet to 350°F (175°C).
- Drop small spoonfuls of dough into hot oil. Fry 2-3 minutes per side until golden brown.
- Remove with a slotted spoon. Drain on paper towels.
- Dust generously with powdered sugar. Serve warm.
Notes
- Use a ripe banana. The spottier, the sweeter. This is the perfect way to use up overripe bananas.
- Don’t overcrowd the pot. Fry in batches to keep the oil temperature steady.
- Test the oil first. Drop a tiny piece of dough in. If it sizzles and floats, you’re ready.
- Storage: Best fresh. Leftovers keep in an airtight container for 1-2 days, but they lose their crispiness.






Leave a Reply